
Turning a simple image into a clean design for print is not hard. You just need the right steps. Many people try it but get blurry or messy results. This happens when the image is not ready for print.In this guide, I will share easy tips that I use in real work. These tips will help you Create Vector Art For Printing and get sharp, clean results every time.
Why Print-Friendly Designs Matter
Printing is not the same as viewing on a screen. A design may look good on your phone. But when you print it, it may look dull or pixelated.
What Happens with Bad Designs?
- Lines look broken
- Colors look faded
- Edges look rough
- Text becomes hard to read
This is why you must prepare your design in the right way.
Understand the Difference Between Image Types
Before you start, you must know about two types of images.
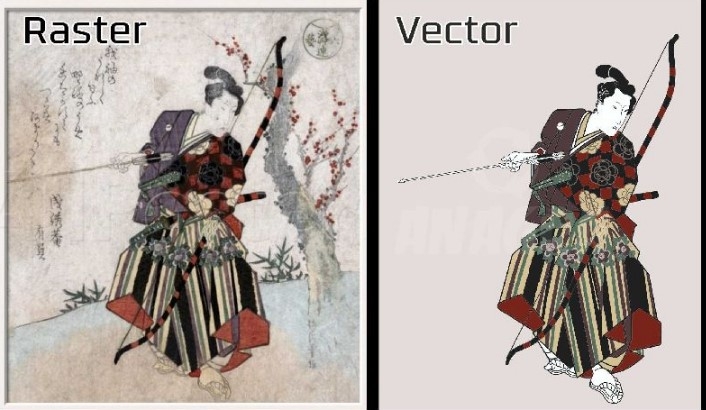
Raster Images (Pixel-Based)
These are common images like JPG and PNG.
Features:
- Made of pixels
- Lose quality when zoomed
- Good for photos
Vector Images (Path-Based)
These are clean and scalable designs.
Features:
- Made with lines and shapes
- Do not lose quality
- Best for printing
Why Vector is Better for Print
Vector images stay sharp at any size. This makes them perfect for logos, shirts, and banners.
Start with a High-Quality Image
Always Choose a Clear Image
Do not start with a blurry image. It will make your work harder.
Tips:
- Use high resolution images
- Avoid small or compressed files
- Check for sharp edges
A good input always gives a good output.
Clean the Image First
Before converting, clean your image.
Remove Noise and Background
A messy image leads to a messy design.
What to Do:
- Remove unwanted parts
- Clean the background
- Fix rough edges
Use Simple Tools
You can use tools like:
- Background remover
- Basic editing software
Convert Image into Vector Format
This is the main step.
Use Vector Conversion Tools
You can use software like:
- Adobe Illustrator
- CorelDRAW
- Free online tools
Manual vs Auto Conversion
Auto Conversion:
- Fast
- Easy
- Less control
Manual Conversion:
- Takes time
- Gives better results
- More clean output
From my experience, manual work always gives the best print quality.
Focus on Clean Lines and Shapes
Keep Edges Smooth
Rough lines look bad in print.
How to Fix:
- Adjust anchor points
- Smooth curves
- Remove extra nodes
Simplify the Design
Do not overcomplicate.
Keep:
- Clean shapes
- Simple lines
- Balanced spacing
Choose the Right Colors
Color plays a big role in print.
Use CMYK Color Mode
Screens use RGB. Printing uses CMYK.
Why It Matters:
- Colors print differently
- RGB may look brighter on screen
- CMYK gives true print color
Avoid Too Many Colors
Too many colors can increase cost and reduce clarity.
Check the Size and Scale
Set Correct Dimensions
Always set the size before finalizing.
Tips:
- Use real print size
- Keep proportions correct
- Avoid stretching
Test at Different Sizes
Zoom in and out.
Check if your design still looks clean.
Pay Attention to Text
Text is very important in print designs.
Use Clear Fonts
Avoid fancy fonts that are hard to read.
Good Practice:
- Use bold fonts
- Keep spacing clean
- Convert text to outlines
Check Spelling
Always double-check your text before printing.
Save in the Right File Format
File format matters a lot.
Best Formats for Printing
- AI
- EPS
- SVG
Avoid Low-Quality Formats
Do not use:
- JPG (for final print)
- Low-res PNG
Test Before Final Print
Never skip this step.
Do a Sample Print
Print a test version.
Check:
- Colors
- Sharpness
- Alignment
Fix Issues Early
It saves time and money.
Common Mistakes to Avoid
Using Low-Resolution Images
This is the most common mistake.
Not Converting to Vector
Raster images do not scale well.
Ignoring Color Mode
Wrong colors can ruin your design.
Overloading the Design
Too many elements make it messy.
Tools That Make Work Easy
Beginner-Friendly Tools
- Canva (basic edits)
- Inkscape (free vector tool)
Professional Tools
- Adobe Illustrator
- CorelDRAW
From my work, professional tools give better control and results.
Real Experience Tip
In real projects, I have seen one thing again and again.
A client sends a small logo. They want it printed on a large banner. The result becomes blurry.
The fix is simple. Convert it into a clean vector first. Then adjust the size.
This is why experts always focus on vector design.
Why Professional Help Matters
Sometimes, doing it yourself is not enough.
When to Hire Experts
- Complex designs
- Large print projects
- Brand logos
A trusted service like Embroidery Digitizing Services in USA - Digitizing Buddy can help you get clean and print-ready designs.
They have real experience. They know how to handle detail and quality.
Advanced Tip: Keep Layers Organized
Use Layers Properly
Layers help you manage your design.
Benefits:
- Easy editing
- Better control
- Clean workflow
Name Your Layers
This saves time later.
Advanced Tip: Use Grid and Alignment
Keep Everything Balanced
A design should look neat.
Use:
- Grid lines
- Alignment tools
- Equal spacing
This makes your design look professional.
Make Your Design Print-Ready
Now combine all steps.
Final Checklist
- Image is clean
- Converted to vector
- Colors in CMYK
- Size is correct
- Text is readable
- File saved in proper format
If all is good, your design is ready.
Build Trust with Quality Work
If you want to grow in this field, focus on quality.
What Builds Trust?
- Clean designs
- Accurate colors
- On-time delivery
Brands like Embroidery Digitizing Services in USA - Digitizing Buddy focus on these points. That is why people trust them.
Keep Learning and Improving
Design is a skill. It improves with practice.
Try New Things
- Test new tools
- Practice tracing
- Study good designs
Learn from Mistakes
Every mistake teaches something.
Final Thoughts
Turning images into print-ready designs is not hard. You just need the right method.
Start with a good image. Clean it. Convert it into vector. Fix colors and size. Test before printing.
If you follow these steps, your designs will always look sharp and professional.
And if you want expert-level results, working with trusted services like Embroidery Digitizing Services in USA - Digitizing Buddy can make a big difference.
Keep it simple. Keep it clean. That is the secret to great print designs.